priti®perfect:

The perfect complement for a healthy-looking smile

To ensure successful results when working with priti®perfect Stains and Structure pastes, this page provides the step-by-step process, including a firing schedule and product information.

Compact:         Esthetically appealing + fluorescent pastes with only 20 ingredients
Effective:         1-firing-solution is possible
Controllable:    The final colors are already visible as the paint is being applied
 

That's how it's done!

For your reference, two possible techniques are outlined below. First, we will discuss the Fast, Single-Firing Method, followed by a Multi-Firing Method for maximum customization.


Preparation

  • Sandblast the surface to be glazed with 50 microns of AlO2 und 2 bar
  • Clean the surface with a steam cleaner
  • Ensure that the surface is completely dry
  • Do not use metal instruments to remove the paste from the tub (better glass, plastic or Agate)

Tip: For best results, use a synthetic brush tip!


Fast, Single Firing Method

1. Application of glaze:

  • Place a few drops of liquid onto a glass plate. Next to it, set a small mound of glaze material.
  • Moisten a paintbrush with the liquid, then pick up a small amount of glaze onto the end of the brush.
  • Apply a thin, even layer of glaze to cover the entire surface of the tooth. Avoid thick layers or creating puddles, especially between teeth.

Caution: Do not use too much glaze or liquid!


2. Application of stains and structure:

On the glazed surface of the tooth, apply stains and structure effects as needed:

  • shade A, B, C, or D → Cervical area for shade enhancement or correction.
  • transpa-pigeon or transpa-blue → Incisal edges for the illusion of higher translucency.
  • transpa-orange → Incisal edges to create a mamelon effect, to achieve warmth in the incisal edge.
  • Copper → Occlusal or palatinal surfaces for darker dentine depth.
  • Black mixed with transpa-pigeon → Incisal edges to intensify translucency.
  • White (ultra-thin brush, thin line) → Crack effects.
  • Fissure powder (small crumb) → Occlusal fissure for discoloration/aging effect. (Caution: not always desired)
  • Structure Clear → Approximal edges to enhance contact points.

Now FIRE the restoration.


Minimal Cut-Back Method

2-3 firing solution

Application of Structure material to a tooth or cut-back:

  • Apply a very thin layer of glaze to the entire surface of the restoration in order to reduce the surface tension so that the stains can be applied smoothly and evenly without tension.
  • Apply stains to the areas which require characterization
  • FIRE
  • Apply structure materials on top of the stained tooth surface to create a minimal layer, contact points, give more texture to the surface or enhance the anatomical shape of the tooth.
  • FIRE
  • Trim the excess of the tooth with a diamond bur, finish the surface of the tooth.
  • Apply glaze to the surface of the tooth.
  • FIRE


Firing Parameter

The temperatures and times given in the table are only for guidance.

This table shows the basic parameters for firing priti perfect. Each furnace is different; therefore, the parameters need to be adjusted according to the desired level of gloss. Larger objects must remain in the furnace or longer.

Firing Parameter Standard Large Lithium disilicate
Pre-drying 3 mins 10 mins 3 mins
Starting temperature 450 °C 450 °C 450 °C
Closing time 4 mins 5 mins 3 mins
Temperature rise 40 °C/min 30 °C/min 55 °C/min
Vacuum start 670 °C 670 °C 670 °C
Final temperature 775 °C 775 °C 720 °C
Hold time 1 min 1–2,5 min 2 min
Long-term cooling 3 mins 10 mins -


Firing Procedure

This table shows the basic parameters for firing priti®perfect.

  • Each furnace is different; therefore, the parameters need to be adjusted according to the desired gloss level of the surface.
  • Always allow the priti®perfect materials sufficient time to pre-dry before starting the firing sequence.
  • Always start the vacuum after 670°C!
  • Monolithic long-term cooling / The more voluminous the work is, the more important long cooling is.

This table is divided into standard and larger restorations.

Standard

  • single unit crowns and small bridges

Larger restorations

  • Voluminous monolithic restorations
  • A full firing tray.
  • If you have used a lot of stains and structure materials.


What is priti®perfect about?


    The fluorescent staining and structural pastes priti®perfect are the perfect complement for a life-like surface finish using a fast 1-firing sequence or, as required, multiple firings with internal staining. Each color is in the form of a pre-mixed paste and can be applied using a brush. The final colors are already evident during application. These low-fusing stain and structure pastes can be used to individualize and characterize all ceramic surfaces.

    Approved for: 
    - Zirconium dioxide                                                                                                                                                      - Zirconia layering ceramics                                                                                                                                      - Metal ceramics                                                                                                                                                          - Lithium disilicate

    This is the coefficient of thermal expansion:
    CTE 10.0-10.6 10-6 K-1 (25–500°C)

    You can find further information about the pastes and sets here.

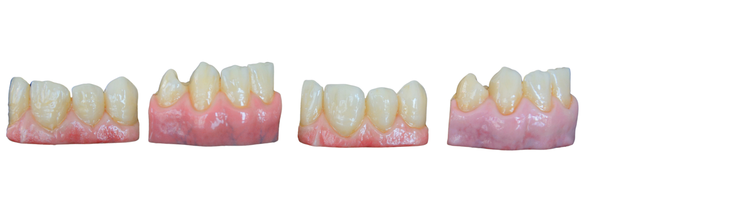
    priti®perfect PINK: That's how Gingiva is done!

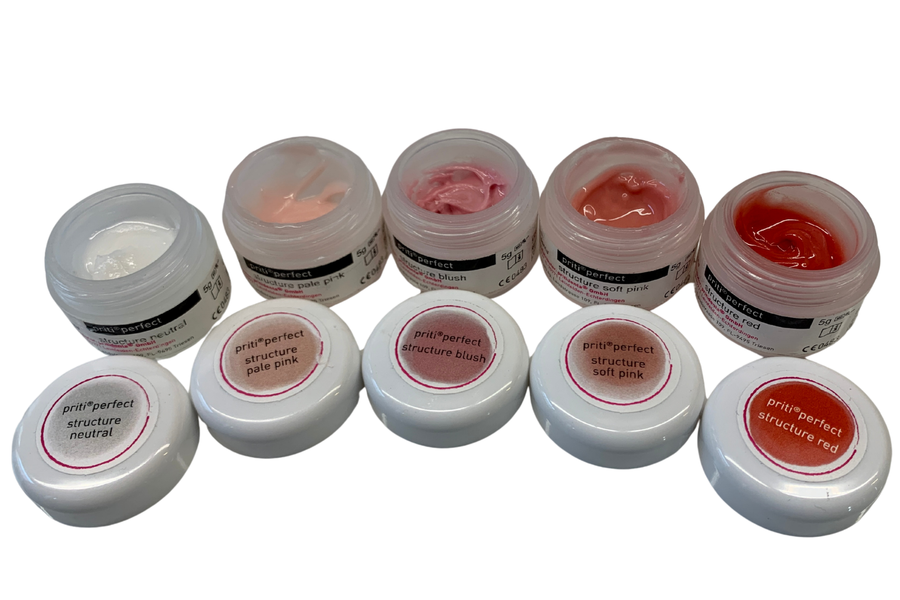
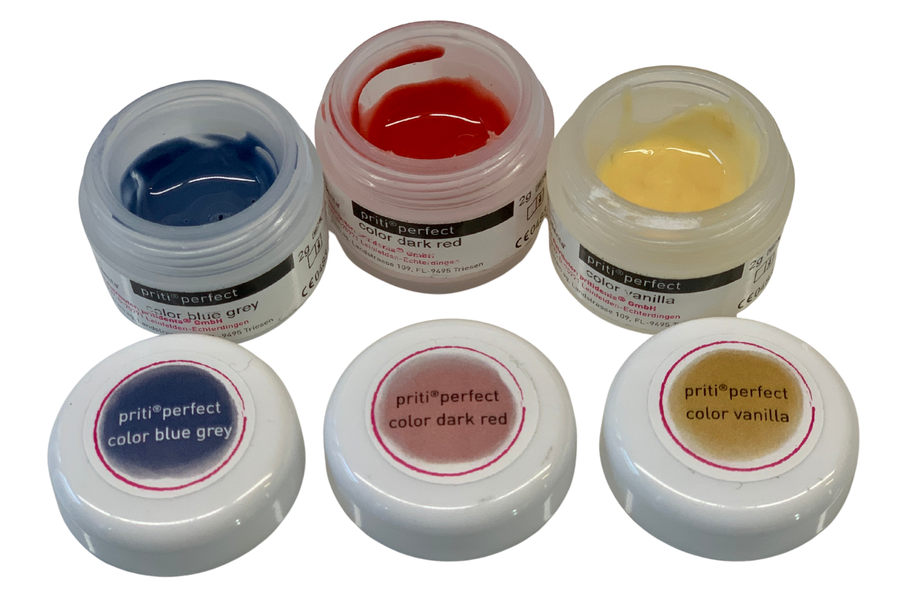
    The priti®perfect PINK Set: 

    • 8 components
    • 1 liquid
    • 5x Structure Materials (ceramics)
    • 3x Intensive Stains for mixing 
    • None are fluorescent 
    • Brush application
    • The finale colors aee already evident during application
    • 1-firing soloution is possible
    • Multiple firings are possible


    This set is designed with 5 structure materials and 3 intensive shades.                                                            Note: All pastes can be mixed according to the color of the gingiva.

    5 Gingiva structure colors:

    • Structure red
    • Structure soft pink
    • Structure blush
    • Structure pale pink
    • Structure neutral


    3 stains for mixing:

    • Color dark red
    • Color vanilla
    • Color blue grey


    HOW IT WORKS. STEP BY STEP.

    STEP 1: Application of priti®perfect PINK          

    1.  Preparation of materials: 

    Place a small amount of each Structure color onto a clean glass plate.  

    2. Adjustment of consistency: 

    Add a tiny drop of liquid to slightly dilute the material, making it soft enough to be applied with a fine paintbrush.

    3. Color selection: 

    Using the five available Structure shades, it is possible to reproduce the majority of natural gingival tones.


    4. Customization of shades: 

    If a different tone is required, the Structure materials can be combined with stains to achieve a darker, more pigmented gingival appearance. 


    - First apply an even layer of either Structure blush or Structure soft pink to the surface. -


    STEP 2: Characterization with Gingiva Materials

    1.  Enhancing darker gingiva areas: 

    Apply a darker shade, such as Structure Red, to reproduce regions with stronger blood supply, for example, the interdental papillae (areas between the teeth).  

    2. Areas with lower vascularization: 

    Use Structure Pale Pink in regions with reduced blood supply, such as directly at the cervical (neck) portion of the tooth.

    3. Recreating anatomical details:

    For features like thelabial frenulum, apply Structure Neutral to achieve a natural and lifelike appearance.


    STEP 3: FIRE

    Please see the table below for detailled firing parameters.  

    Firing Parameter Standard Large restorations
    Pre-drying 3 mins 10 mins
    Starting temperature 450 °C 450 °C
    Closing time 4 mins 5 mins
    Temperature rise 40 °C/min 30 °C/min
    Vacuum start 670 °C 670 °C
    Final temperature 775 °C 775 °C
    Hold time 1 min 1–2,5 min
    Long-term cooling 3 mins 10 mins

    FAQs - Troubleshooting

    Reason:

    • If the vacuum sets in earlier, there is a risk of graying. This is because we are working with pastes, not powders. The liquid in the pastes will not be dry at 450 degrees, so when the vacuum kicks in, the liquid will be trapped and burn up suddenly.

    Solution:

    • Ensure that the surface is completely dry before the vacuum starts. Lengthen the pre-drying time.

    Reason:

    • If you are working with materials that need to be fired below 755 degrees, for example, lithium disilicate, which is fired a little lower. 

    Solution:

    • Fire at 720 degrees, then increase the hold time from 1 minute to 2 minutes.

    Reasons:

    • Firing temperature too low 
    • Too much liquid used 
    • Using Natural-Hair Brushes

    Solutions:

    • Increase the firing temperature to 775°C
    • Use only glaze to achieve a gloss finish. Liquid does not produce a glazed surface.
    • Use brushes with synthetic bristles


    Reason:

    • The restoration has a relatively high volume. Zirconium dioxide exhibits very low thermal conductivity, meaning it absorbs heat slowly and releases it gradually.

    Solution:

    • Do not increase the firing temperature. The restoration needs to be kept in the furnace for longer. Lower the rate of temp. increase to 20-30°C/min Increase the holding time to 1:30 min – 2:30 min.

    Reasons:

    • The ceramic gingiva material has not fired properly.

    Solution:

    • Do not increase the firing temperature. The restoration needs to be kept in the furnace for longer. Lower the rate of temp. increase to 20-30°C/min Increase the holding time to 1:30 min – 2:30 min

    Reasons:

    • Too much glaze used
    • Glaze too thick

    Solution:

    • Apply a thin layer to cover the surface.

    Reasons:

    • Too much glaze used
    • Glaze too thick

    Solutions:

    • Apply a thin layer to cover the surface
    • Apply a thin layer to cover the surface and increase pre-heating phase to allow to dry before starting the furnace.

    Reason:

    • Too much glaze used and puddles have formed in the approximal areas.

    Solution:

    • Apply a thin layer to cover the surface and ensure that no puddles are formed.


    Reasons:

    • Too much glaze used
    • Glaze too thick

    Solution:

    • Apply a thin layer to cover the surface. Do not add any liquid!

    Reasons:

    Thermal stress!

    • The restoration has cooled too quickly 
    • Was the restoration taken out of the furnace too soon?
    • Is the furnace close to an open window?
    • Is the furnace in a busy area of the lab?

    Solution:

    • Zirconium dioxide behaves in a manner comparable to glass with respect to thermal stress.  Rapid heating or cooling can cause significant temperature gradients within the material, leading to internal stresses and potential crack formation.  To mitigate this risk, the restoration should undergo a controlled, gradual cooling phase following the firing cycle.